Manage email messages by using rules in Outlook
New Outlook
- If the steps under this New Outlook tab don't work, you may not be using new Outlook for Windows yet. Select the Classic Outlook tab and follow those steps instead.
- Currently, new Outlook does not support rules for managing third-party accounts like Gmail, Yahoo, and iCloud. To set up rules for these accounts, please configure them through the respective email service providers.
In new Outlook, you have the option to:
Create a rule | Edit a rule | Delete a rule | Set rule order | Run rules | Disable rules
Create an inbox rule for new Outlook for Windows
Rules are applied to incoming messages and can be created from any folder.
To quickly create a rule that moves all email from a specific sender or a set of senders to a folder, right-click a message in your message list that you want to create a rule for, hover over Rules and then select Create rule.
Choose the folder where you want all messages from that sender or set of senders to be moved, and then select OK.
After selecting OK, the rule will be applied to all incoming messages.
If you'd like to do more than just move the message from a specific sender or set of senders to a folder, select More options. The rules settings menu will open.
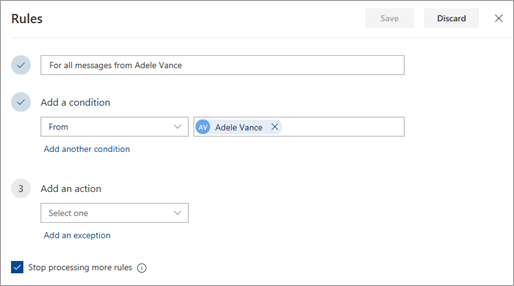
Every rule needs at least three things: a name, a condition, and an action. Rules can also contain exceptions to conditions. You can add multiple conditions, actions, and exceptions at each step by choosing Add a condition, Add an action, and Add an exception.
If you don't want any more rules to run after this one does, select the Stop processing more rules check box. For more information, see Stop processing more rules in Outlook.
Press Save to create your rule or Discard to cancel rule creation.
Edit an inbox rule in new Outlook for Windows
At the top of the page, select Settings .
Select Mail > Rules.
- In the rule you want to edit, select.
Press Save to save your edited rule.
Note: Some rules created in classic Outlook can't be processed by new Outlook because they are client-side rules. To fix a rule that was migrated from classic Outlook, create a new rule to replace it.
Delete an inbox rule in new Outlook for Windows
At the top of the page, select Settings
.
Select Mail > Rules.
- In the rule you want to delete, select
.
Tip: If you just want to turn the rule off for a while, select the toggle next to the rule.
Set the order in which inbox rules are applied to incoming messages in new Outlook for Windows
Inbox rules are applied to incoming messages based on the order they're in within the Inbox rules list. You can arrange the order in which the rules you create are applied to messages coming into your inbox.
At the top of the page, select Settings
.
Select Mail > Rules.
Select a rule, and then use the Up arrow or Down arrow to change the order in which the rule is applied to incoming messages.
Run inbox rules on existing messages in new Outlook for Windows
By default, an inbox rule runs on incoming messages after you've created the rule. To run a rule on existing messages:
At the top of the page, select Settings
.
Select Mail > Rules.
- Select
next to the rule you want to run.
Disable and enable rules in new Outlook for Windows
If you'd like to temporarily pause, or suspend, a rule from operating and you don't want to delete it, consider disabling the rule. To disable or enable a rule:
At the top of the page, select Settings
.
Select Mail > Rules.
- Use the toggle next to the rule name to disable or enable the rule.
Classic Outlook
Create a rule on a message in classic Outlook for Windows
Right-click an existing message and select Rules > Create Rule.
Select a condition, and what to do with the message based on the condition.
For example, to move messages with a certain title to a specific folder, select the Subject contains condition, select Move the item to folder, select or create a New folder, and then select OK.
When you're done creating the rule, select OK.
To use the rule right away, select the Run this new rule now on messages already in the current folder checkbox, and then select OK.
The message now appears in that folder.
Create a rule from a template in classic Outlook for Windows
Select File > Manage Rules & Alerts > New Rule.
Select a template.
For example, to flag a message:
Select Flag messages from someone for follow-up.
Edit the rule description.
Select an underlined value, choose the options you want, and then select OK.
Select Next.
Select the conditions, add the relevant information, and then select OK.
Select Next.
Finish the rule setup.
Name the rule, setup rule options, and review the rule description. Click an underlined value to edit.
Select Finish.
Certain rules will only run when Outlook is on. If you get this warning, select OK.
Select OK.
Edit a rule in classic Outlook for Windows
If you've set rules to organize your incoming mail but they're not all working as you expect them to, these steps might help you find and fix the problem.
To fix a broken rule:
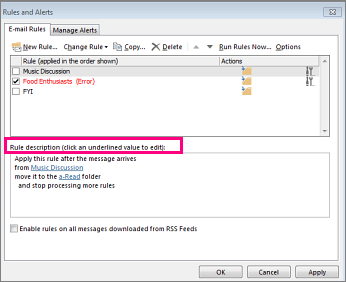
Click File > Manage Rules & Alerts.
If you see a message that says you have a broken rule that needs to be modified, click OK.
Check the box next to the rule in red.
Click the links under Rule description and edit the rule as needed, and then click OK.
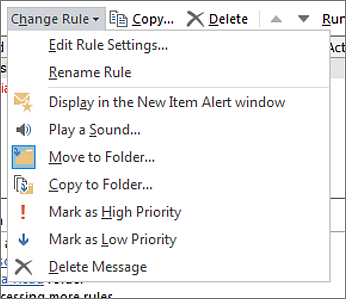
To change the settings, name, location or behavior of a rule:
Click File > Manage Rules & Alerts.
Check the box next to the rule that you want to modify.
Click Change Rule, click the type of change you want to make, and then complete the steps.
Note: To delete a rule, in the Rules and Alerts dialog, check the box next to the rule, and then click Delete.
Delete a rule in classic Outlook for Windows
You can delete a rule when it's no longer necessary.
On the File tab, choose Manage Rules & Alerts.
In the Rules and Alerts dialog box, on the E-mail Rules tab, choose the rule you want to delete.
- Choose Delete> OK.
Tip: To temporarily suspend a rule, clear the check box next to the rule. This enables you to keep the rule and turn it on later.
Run rules manually in classic Outlook for Windows
You can manually run one or more rules.
On the File tab, choose Manage Rules & Alerts, and on the E-mail Rules tab, choose Run Rules Now.
In the Run Rules Now box, under Select rules to run, select the check box for each rule that you want to run.
In the Run in Folder box, to select a different folder, choose Browse, choose the folder, and then choose OK.
Select the Include subfolders check box to include all folders under the folder you chose in step 3.
In the Apply rules to list, accept the default setting of all messages, or change to read or unread messages.
Choose Run Now.
Create custom actions rules in classic Outlook
There are third party developers who write custom action rules add-ins in the form of dynamic link library (.dll files) that you must install on the computer running classic Outlook before you can use them. Microsoft doesn't provide custom action add-ins.
Learn how to Use add-ins in Outlook.
Note: A rule with a custom action runs only on the computer where it is installed and only when Outlook is running.
Resources
See also:
Use rules to automatically forward messages in Outlook
Edit or fix a broken rule in Outlook
Stop processing more rules in Outlook
Related Articles
Full Mailbox Storage Solutions - Outlook
Manual Mailbox Cleanup 1. Deleted Items Folder Old or unnecessary deleted emails can accumulate quickly. Outlook Desktop Go to the "Deleted Items" folder in the left pane. Right-click on the folder and choose "Empty Folder". Outlook Web Click on ...Turn on automatic forwarding in Outlook on the web or Outlook Desktop
You can automatically forward or redirect your email messages by setting up Inbox rules in Outlook on the web. This is useful if you want to read and respond to messages from another email account or when you want someone else to receive and respond ...Import or export a set of rules
Import or export a set of rules Outlook for Microsoft 365 Outlook 2021 Outlook 2019 Outlook 2016 Outlook 2013 You can import or export rules for Outlook messages so that others can use them. When you import rules to an Outlook account, they are added ...How to Adjust Outlook Mark Items as Read Timer
https://www.groovypost.com/howto/adjust-outlook-2016-mark-items-as-read-timer/ By default, Outlook is set to mark a message as read immediately after switching to the next one. Microsoft knows that everyone likes to manage their inbox differently, so ...Create and Add an Email Signature in Outlook
In Outlook, you can create one or more personalized signatures for your email messages. Your signature can include text, links, pictures, and images (such as your handwritten signature or a logo). New Outlook Note: If the steps under this New Outlook ...