Ally Voice Office Manager Training Guide
Determine if you are an Office Manage or Site Manager.
Office Managers can edit for the entire domain.Site Managers can only see/edit things assigned to the site they manage.Office Manager and Site Manager trainings will still cover all the same things.
The Home Page
This is the first screen seen once logged into the Ally Voice Portal.
1. Click these icons to access the different pages / functions of the phone system.
2. The Current Active Calls window. This will show information on live calls, as they won't show in the reporting page until the call is complete.
3. The Call Graph shows an average number of calls over a period of time so you can see peak busy times and trends.
4. Users and Applications provides an overview of all the editable things within the organization - users and inventory should only ever be edited by Ally Communications as totals can affect billing.
5. Usage Statistics provides a number based overview of call statistics in comparison to the call graph.
6. This is a very useful link for to be able to get to our Knowledge Base Articles if you need assistance editing or finding anything when we are not available or if you just need a refresher on how to do something.
The Users Page
Office Managers can see an overview of all the users on their domain. Site Managers will only see users assigned to their site.
Office Manager View:
1. You can toggle between the Users and Site tabs to edit a site if necessary. Not all domains will have sites. Site managers won't see the sites tab.2. The search bar. If you don't see what you need, you can search for it here or click on the column titles to order the columns to better see what you are looking for.3. Clicking the pencil icon next to a name will bring up a list of the things that can be edited within a user.
Site Manager View for comparison:
User Profile Tab
a) Click into a User Profile by selecting the name of the user or Edit > Profile on the far right - common edits might be a name change or updating a user's email address.*Office Managers should resend a Welcome Email in the Advanced tab to reset user passwords and PINs.b) Any changes must be saved at the bottom of the page for them to take effect - this goes for any changes made in any section of the domain.*Other Users will not reflect a name change on phones until phones have resynced, which happens every night, or phones are rebooted.
User Answering Rules Tab
a) Can adjust total ring time before going to voicemail (if enabled on the user), following the unanswered rule if one is set, or ending the call if voicemail is not enabled on the user.b) Can Block numbers under a user's answering rules. This should be done in the "Routing User" if they want a number blocked from reaching anyone in the domain.c) The "Active" will be next to the active time frame, always in real time.d) The description will list what will be done when that user is called during that time frame.e) Click the pencil to edit the Answering Rules of a Timeframe that is applied to the user.
Edit Answering Rules
1) Timeframe will display based on which one you are editing the answering rules for.2) Call Forwarding: Only the "Always" and "When Unanswered" rules should ever be set.If "Always" is being used to forward a call to a personal cell phone, it is recommended they use the Simultaneous Ring section to allow for answer confirmation.*"Always" cannot be used in conjunction with the Simultaneous Ring section. It's one or the other. Can set the unanswered rule in conjunction w/ Simultaneous Ring.3) Simultaneous Ring:Enabled will be checked if utilizing this section.Include User's Extension if checked will ring the user's main phone. If unchecked it will not.Ring All User's Phones is checked by default, meaning if the user adds an extension, whether that's another physical phone or maybe a softphone like the ReachUC app, it will automatically add that phone to be rung as well. If this is not desired, answering rules will need to be edited after the additional extension has been added.Answer Confirmation should be checked if forwarding calls to a personal cell number so they know this is a work call before answering. It will say "Press 1 to accept this call" after they initially answer their cell phone. if they do not accept the call, it will go to the user's voicemail if enabled. If not, not accepting the call will end it.Extension, Number, or Phone field can be used to add a cell number or additional extension(s) on the domain to ring when the user is called. The clock can be selected to delay the ring time of this additional user or phone. 10s is standard.User Voicemail Tab
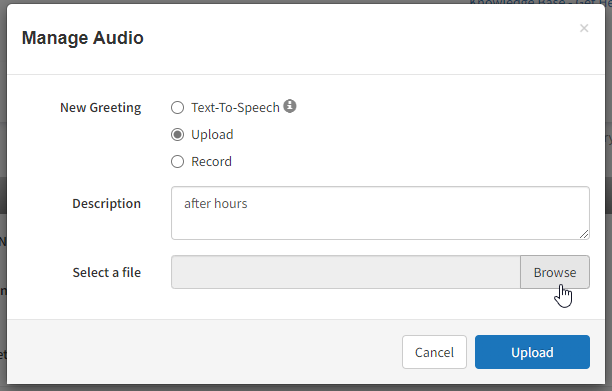
a) Enable Voicemail: will be checked if this is enabled on the user.b) Inbox: Only 2 sections typically used are -Number of Messages (includes saved and new voicemails) - Managers can only clear the entire voicemail box. They do not have access to individual users messages. This can be used in the event an employee left and they had old messages still in their inbox. Contact Ally if you wish to have messages forwarded to another user.Copy to Extension(s) - can use this to copy new voicemails to other extensions so multiple people can get the same voicemail to their personal inboxes. Ex. Cathy is on vacation so copies VMs left for her to Sheila so she can follow up while Cathy is gone.** would need to manually remove people from being copied when no longer needed. VMs will not be cleared from the copied extension when listened to on the main extension & vice versa.c) Data: Total storage being used for voicemails, MOH, Faxes, and greetings. Limited to 25MB per user (more than enough). Once full, clearing data will clear everything using up the data. Recommended to never do without considering everything cleared cannot be recovered.d) Fax: Users that are copied on faxes can access them through their voice portals as well as be sent an attachment via email (check for HIPPA Compliance needs if this is being used). Managers can only clear Faxes, not view them from here. If the office managers have access to faxes, they will be able to view and manage them by going into their personal profile (Click Name in top right corner > My Account).Once faxes are deleted, they cannot be recovered without submitting a ticket to Ally. You must provide sender caller ID number and estimated delivery date to request recovery of a fax.e) Greetings: Voicemail Greetings are set up by Ally at first using the default "Hello, {firstname} {lastname} is unavailable. Please leave a message." Each user can edit this themselves or a Manager can edit it for them. Review the Text-to-Speech, Upload, and Record Options.*Recorded Name only needs to be configured if the domain is using a System Company Directory off of an Auto Attendant.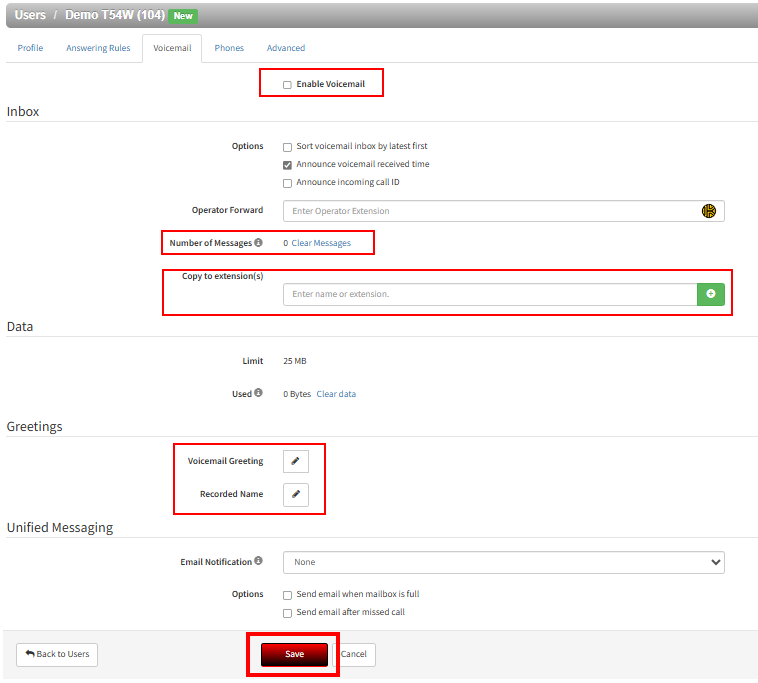
User Phones Tab
Provides phone information of the specific user. The green check will be a red X if the phone is offline. This info can also be found in the Inventory > Hardware page.Phones should never be added or removed.This is because removing a phone will cause it to no longer work.Please contact Ally if you wish to offboard a user or phone.User Advanced Tab
Managers can resend a Welcome Email from this tab.Resetting a user will default the user of all settings (Delete phone, VM Settings, Answering Rules, Profile Settings, etc).We recommend sending a Welcome Email for password resets, as the email will include the users login name, and also allow reset of the Voicemail PIN.Office Managers may send a password reset email, but they would need to select the Send recovery email box if they choose to do so. PIN will not reset when doing this.
The Conference Page
Conference Bridges Require dedicated phone numbers.Most domains will not have a conference bridge, but it is an option. Example provided.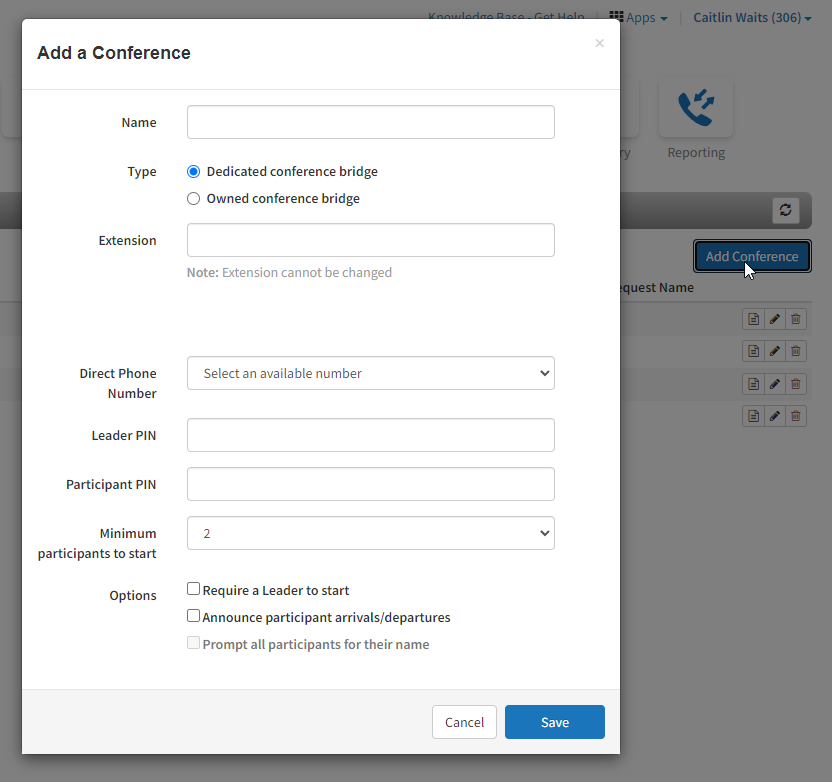
The Auto Attendants Page
There are a lot of options with how to route off of an Auto Attendant, so please review carefully before making changes.Contact Ally with significant change requests.
- Press Play to listen to the attendant without having to click into it.
- Add Attendant will ask for a name, extension number, and timeframe. ALWAYS use "Default" as the timeframe for all auto attendants. The numbering convention is 5xxxx. For CSCs, it is 5xxx1 with the store # as the middle 3 didgits, then 5xxx2, etc.
- **Restricting it to a specific timeframe can cause issues if you need to route to it during another timeframe. You cannot edit the timeframe once the AA is created. You would have to delete and rebuild the AA to change the timeframe.
- To edit, you can either click on the name of the AA or the pencil to the right of the AA.
Configuring an AA
- You can configure an Intro Greeting to the AA - this is rarely used. If you have questions about implementation, please reach out to us by phone or email helpdesk@allyadvantage.com
Menu Prompt
You can play your AA, download the .wav file, or use the pencil to edit the message of your AA. Options for audio are Text-To-Speech, Upload, or Record.*Make sure the AA message details the options you have configured in the dial pad.*Alternatively, you can configure a dial option on the dial pad menu without announcing it in the attendant, such as a ring through option after hours on 9 for employees/vendors to use (they must be made aware internally the option is there though).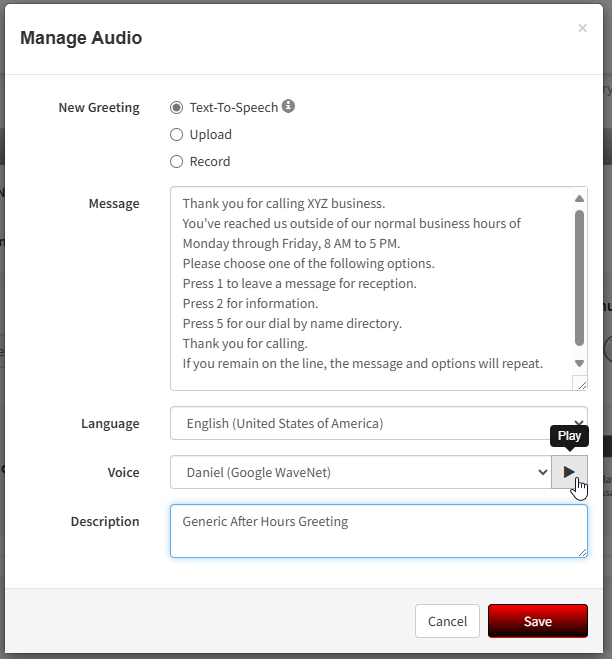
Gear - Attendant Settings
- Check the Enable Dial by Extension radio button if you want callers to do just that.
- Set the "If no key is pressed" rule. Repeat the Greeting Prompt is the default rule.
- You can also make the call automatically end by setting the rule to "hang up" if they do not choose an option. Usually only used for after hours and unexpected closings messages. Not used often even in those cases.
- You must program a number on the dial pad and choose to follow that number if you want it to follow a specific path without the caller having to select an option.
- ex. "If you are unsure who you need to speak with, please remain on the line." would translate to setting the "If no key is pressed" rule to "Follow x" that routes to a user or call queue.
- If unassigned key is pressed, i.e. a key that is not configured to do anything. ^^
- Timeout before first key press
- Timeout after last key press
- Maximum key presses to collect
Dial Pad Menu
1. User: Route directly to a specific user within the domain. The answering rules of the user will determine what happens once the user is routed to.
* Optional - You can set a Prefix to the Caller ID so the user knows the call is coming direct from an AA / indicate what the call may be about.
**Uncheck "Enable enhanced voicemail" if you don't want the system to give the caller the opportunity to dial another extension before playing the voicemail greeting of the voicemail box you have routed to.
2. Conference: A Conference Bridge has to be setup and configured in order to route to one off of an AA.
3. Call Queue: Select the call queue to route to. Can also select system announcements for callers (no announcement is the default.)
* Optional - You can set a Prefix to the Caller ID so the users in the queue knows the call is coming direct from an AA / indicate what the call may be about.
4. System Directory: Will prompt the caller to enter the corresponding digits of the first three letters of the last name of the person they are trying to reach. This uses the entered last name of the users that have the "audio directory" selected on their user profile.
5. Voicemail: Routes directly to the voicemail box of any system or standard user that is enabled on the domain.
*Uncheck "Enable enhanced voicemail" if you don't want the system to give the caller the opportunity to dial another extension before playing the voicemail greeting of the voicemail box you have routed to.
6. Voicemail Management: Allows users to call into the system from an off-net number to check their voicemail. -- not necessary for users with portal access, so rarely used
7. External Number: Used to forward calls to off-net numbers.
*It is recommended to setup a virtual user to forward calls if going to a cell phone so off-net answer confirmation can be used - "Press 1 to accept this call" notifies the cell phone user that it is a work call
8. Play Message: Can configure informational messages that do not offer any further dial options. Then configure what happens after the message plays.
9. Repeat Prompt: Will repeat the main menu prompt. Usually used if the AA settings follows a dial option action instead of repeating the prompt if no key is pressed.
10. Add Tier: Will create a secondary tier where more dial options would be available to configure.
*Ex. Main Prompt - "Press 3 for catering options." > 2nd tier prompt "Press 1 to speak with someone to place an order. Press 2 to return to the main menu."
The Call Queues Page
SNOM phones do not work within a queue. Any desired call flow changes for clients with SNOM phones must be discussed with an Ally technician.
- The Name of a Queue can be changed if needed. Click the Name column header to sort by name.
- The Extension number cannot be changed once created. Queues use the 3xxxx numbering convention. For CSCs, the store number is the middle three digits 3xxx1, then 3xxx2, etc.
- Must assign a Site to the queue if using Site Managers or there are multiple locations in a single domain.
- The Type of call queue will be shown in this column.
- Round-robin (longest idle): Route callers to the available agent that has been idle longest {rarely used}
- Ring All: Route callers to all available agents at the same time
- Linear Hunt: Route callers to the available agents in a predefined order. The order is defined when editing the queue's agents. Rings all agents in a group with the same priority, then will ring next group separately after the agent timeout length.
- Linear Cascade: Routes callers to groups of available agents in a predefined order. The order is defined when editing the queue's agents. Will ring the first group and then simultaneously ring the next group after the agent timeout length.
- Call Park: Place the caller on hold until an agent retrieves them. (basically a dynamic hold anyone on the domain can pick up)
- Callers in Queue will show active callers waiting in the queue, not calls answered from the queue.
- Agents(Available) reflects the number of agents and how many are available in parenthesis.
Icons: 


Configuring Call Queues
Ring All
1. Click Add Call Queue
2. Select the Basics of the queue. "Name" the queue (should always have Queue in the name), set Extension number(3xxxx), select Ring All as the type. The tag "Ring All" will then show at the top of the window and you can configure your queue further.
* always set "Record Calls" to no unless otherwise needed & "Statistics" to yes. If an intro message to the agent is needed, that can be configured once the queue is created.
3. The Pre-Queue Options tab is where you will set what happens before the caller enters the queue and what happens if no one in the queue can accept a call, whether busy or offline.
- Require Agents: Requires at least one agent to be online before sending the caller to the queue. This is always set to yes, unless using the callback option.
- Queue Audio: Must be selected here. You can either use MOH (will use domain default MOH unless otherwise configured specifically for the queue) or Ringback, which is a generic ringing tone. This is what will be heard by the caller while the agents are being rung. Can be edited from the Edit MOH icon once the queue has been created.
- Require intro MOH: should be set to yes if there is to be a message such as "Your call may be recorded for training purposes...", etc. Callers entering in the queue will always hear this message and cannot skip it. Can be edited in the queue's MOH page.
- Max expected Wait: is usually left at unlimited. The maximum expected wait time before the queue is unavailable to new callers. This applies when the queue's average expected wait time reaches the maximum expected wait time; it will then follow the unavailable rule.
- Max Queue Length: The Maximum amount of callers allowed in the queue before it is full and unavailable to new callers -- does not include calls answered from the queue, only calls waiting in the queue.
- Allow Callback option: Allow the system to prompt the user for a callback option instead of waiting if timing conditions are met.
- Forward if unavailable: Callers are forwarded here if the queue has reached its expected max wait time or the queue is full.
- Forward if unanswered: Callers are forwarded here if agents fail to answer before the Queue Ring Timeout. This is required to be set before moving on to the In Queue Options tab.
4. The In Queue Options tab is where you can set what happens once the caller is actively in the queue.
- Queue Ring Timeout (sec): How long the queue will attempt to ring agents before following an exit option. Default is 180s. 30-120s is recommended based on # of agents and groups to ring.
- Logout agent on missed call: (Only shows when editing an existing queue) If an agent misses a call, log them out of the queue. This should almost always be left as a default NO.
- Voicemail: Callers will be given the option to leave a voicemail if agents fail to answer before the Queue Ring Timeout AND forward if unanswered is not set. This voicemail is the Queue's voicemail box and the greeting must be configured in the Queue user's voicemail settings. Useful to share voicemails to multiple people or if a greeting needs to be different than an individual user's voicemail box. Remember to copy vms to the user(s) extension that need to receive them. Set voicemail email option to "send and move to trash" to avoid a full voicemail box, unless an Office Manager will be logging into the portal to periodically empty it.
Linear Cascade/Hunt
The Basic and Pre Queue tabs are the same. The In Queue tab has some additional fields for the agent timeout settings.
- Agent Ring Timeout (sec): How long the queue will ring agents before moving on the the next available. This should be less than the Queue Ring Timeout. If ringing multiple groups, each groups timeout should add up to be less than or equal to the total Queue Ring Timeout. (ex. If total queue ring timeout is 45s with 3 groups of agents, then the agent ring timeout should be 15s or less so that each group has a chance to ring)
- Initial Agent Group to Ring:
- Agent Group to Add After Timeout:
Call Park
Call Park extensions to be used are 721-729. Usually named Park 1, Park 2, etc. If there are multiple sites that need separate parks: Park 1 SiteName1, Park 2 SiteName1 & Park 1 SiteName2, Park 2 SiteName2 should be the naming convention used. The domain MOH is what will be heard by a caller while on a park, unless audio files are added to the Call Park Queue specific MOH. The park will automatically ring back the person that placed the call on park after 120s, so as to not be forgotten about.
The Timeframes Page
- Clicking the name of a timeframe or the pencil icon will bring up the edit window.
- Once a timeframe is created, it cannot be renamed. You would need to delete and create with a new name in that case.
- Timeframes cannot be deleted if they are being used on a User's Answering Rules.
- The type of timeframe can be edited, as well as the dates and/or times it is set for by clicking the name or the pencil to the far right.
* Timeframes will only take effect when applied to the answering rules of the routing user or an individual's answering rules.Add a Timeframe
Always
Always timeframes will always be active if they are above the Default timeframe on the user.Days and Times
Days of the week and times allows you to set weekly recurring timeframes, such as your business hours, or lunch hours.Select the radio buttons to choose which days you want to set the timeframe for, then use the sliders to select the range of time you want the timeframe to be active.You can select the green plus on the far right of each day to split the times; ex. the business hours of a restaurant are 9 am to 2 pm and 4pm to 9pm.In the below example, the Test hours will ring M-Th 9am to 5pm, and Friday 9am to 12:30pm and 1:30pm to 5pm.Specific Dates or Ranges
This timeframe is typically used for pre-planned Vacations, Sick leave, or any time you know you will be Out of Office.You can select specific lengths of time for this type of time frame to automatically be enabled and disabled. *be sure to add the timeframe to your Answering rules above any other rules.Click the date in the drop-down calendar or type in the field to set the date ffor both the start and end fields.Use the slider bars or type in the field to set the desired time for both the start and end fieldsIf adding a single day, the beginning date's time will be saved as 12:00 am and the end date's time will be automatically saved for 11:59 pm instead of the default 12:00 am if left unedited.The current date will always be highlighted yellow on the drop-down calendar.Ex. The restaurant is closed for part of the day July 3rd and the entirety of the 4th of July.
The Music on Hold Page
Please be aware that copyrighted music should only be added if the business has secured the proper licensing.
We recommend utilizing royalty free music if you do not wish to secure licensing. Ally can provide options for royalty free music.
Adding music in the Office Manager dashboard will mean anyone that puts a call on hold will hear the music file you upload.The music file will need to be in a .wav or .mp3 file format.To add the MoH, you must browse to it on your computer and upload the file before or after naming it.If you have multiple MoH files, you should select "Randomize MoH" in Settings for variety so that they won't hear the same thing in the order they were uploaded every single time.If you want them in a specific order, you can prioritize the music by dragging the files above or below each other using the up/down arrows to the far left & ensuring "Randomize MoH" is turned off.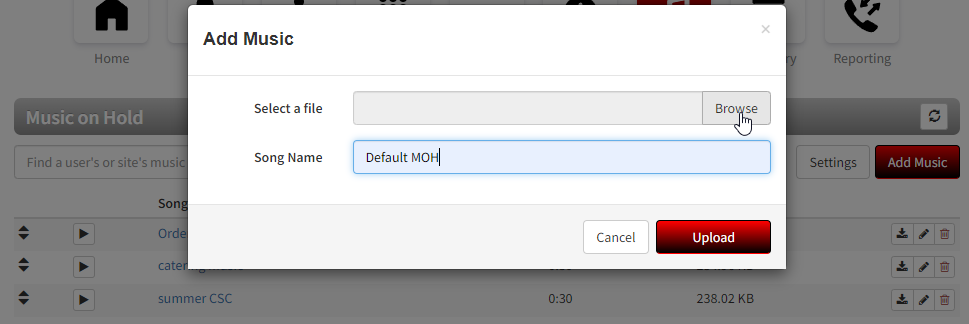
The Call Reporting Page
Call History
- From Name: Inbound Caller ID name - depends on the caller if this is set. It is not in the case of the first call underlined in red, but is in the case of the second call underlined in blue.
- From: The number the call was placed from.
- From User: This will display if there is an internal call.
- To User: Shows what extension was rung. The red underlined is x51842 - which in this case is the After Hours Auto-Attendant. Just below it underlined in blue you see x1184 (a base user with 2 cordless handsets in this case).
- Dialed: This shows the number the caller dialed.
- To: This lets you know where the call was answered to when it ended. The red underlined "system" means that the caller was listening to the After Hours Auto-Attendant. Just below that call underlined in blue, x1184b answered the call, which is a shared extension of the "To" user x1184 that was routed to.
- Date: Date and time of the call
- Duration: Length of the call
- Release Reason: This lets you know how the call ended. There are several codes that may be displayed here, but the two main ones you will see are Orig:Bye (the caller that originated the call, ended the call) & Term:Bye (the person that was called, terminated the call).
- PAC: This is negligible. This refers to the account code and is information that will only be helpful to Ally in the event troubleshooting is needed.
- Cradle to Grave: Shows you the route the call took in a condensed, easy to read version. See below for examples of the first and second calls described. (No timeframe is shown for after hours, because it is using the Default timeframe on the Routing User)
Filtering Call History
Select the Filters Button in the top left of your Call History to narrow your call history search.
From: The date and time of the scope of your search. You can look as far back as 6 months, but the maximum search range you can view at once is only 90 days.
To: The end date and time of your search.
User: You can type an extension number or name in this field
Department: Enter Department name. This will only work if departments are configured in your user's profiles in the Ally Voice portal.
Site: If you have multiple sites under one domain, you can search by site.
Caller Number: You can search if a particular number called inbound (or outbound if users are utilizing direct dial numbers).
Dialed Number: Search if someone internally dialed a particular number outbound, or a particular number was dialed inbound (helpful if you have multiple numbers that route differently).
Call Type: Search for Inbound, Outbound, or Missed Calls within the timeframe you have set.
Once you select "Filter", the search criteria will be applied and searched. Your filters will be displayed next to the filters button. To remove an additional filter that is not needed, you can simply click the "x". A timeframe is the only required filter criteria.
My Account (Personal Basic User Profile)
Go to the top right corner of the screen and click your name > My Account.
To return to the Office Manager dashboard from My Account, click "Manage Organization" in the top right hand corner next to Knowledge Base - Get Help and your name.
Please see the Basic User Training Guide Ally Voice Basic User Training Guide for more details on your personal profile.
Knowledge Base - Get Help
In the top right corner of the screen, there is a link to the Ally Communications Knowledge Base for quick access to our helpful articles on how to make changes in your Ally Voice portal.
Related Articles
Ally Voice Basic User Training Guide
The Home Page This is the first screen seen when logged into your Ally Voice Portal. If you are having trouble logging in, first try the "Are you a new user?" or "Forgot Login Name/Password" links on the login page. If you still have trouble, please ...Office Manager Guide to Masquerading as Users
Masquerading is a feature that is only available by specific request. It is not a default feature for Office Managers. Office Managers can only Masquerade as sub-scope users; meaning an Office Manager cannot Masquerade as other Office Managers. They ...Ally Voice - Accessing the Admin Web Portal
Admin Guide - Accessing the Admin Web Portal Accessing the Admin Web Portal Topics: All administrator tasks are performed from the admin portal. The admin portal is a web-based application that runs on any device (mobile phone, tablet, or PC) running ...Office Managers - How to Update User Voicemail Settings
How to Update User Voicemail Settings This guide is for Office Managers. If you need the guide for Basic Users, please navigate to Basic Users - How to Update Custom Voicemail Greetings 1. Log into the Ally Voice PBX Portal 2. Navigate to the Users ...Viewing Call History
Reporting (Call History) The Reporting page is where you can view the call history, audit logs, and content logs for the domain. Displaying the Reporting Page To display this page, click the Reporting icon on the menu bar. The refresh button at the ...