Viewing Call History
Reporting (Call History)
The Reporting page is where you can view the call history, audit logs, and content logs for the domain.
The Reporting page is where you can view the call history, audit logs, and content logs for the domain.
Displaying the Reporting Page
To display this page, click the Reporting icon on the menu bar.
The refresh button at the top-right side of the page refreshes the information on the page.
button at the top-right side of the page refreshes the information on the page.Permissions
Basic User, you may only view your own call history.
Site Manager, you may view calls for your Site.
Office Manager - You may view all calls for the account.
Basic User, you may only view your own call history.
Site Manager, you may view calls for your Site.
Office Manager - You may view all calls for the account.
Office Manager - You may view all calls for the account.
Call Recording
Call recordings are only readily available to be listened to on the Call Reporting page for users with the advanced feature enabled.
**Call recordings can still be provided upon request within 5 days of the call being placed.**
Office Managers and Ally technicians can access additional call history data for other users if needed.
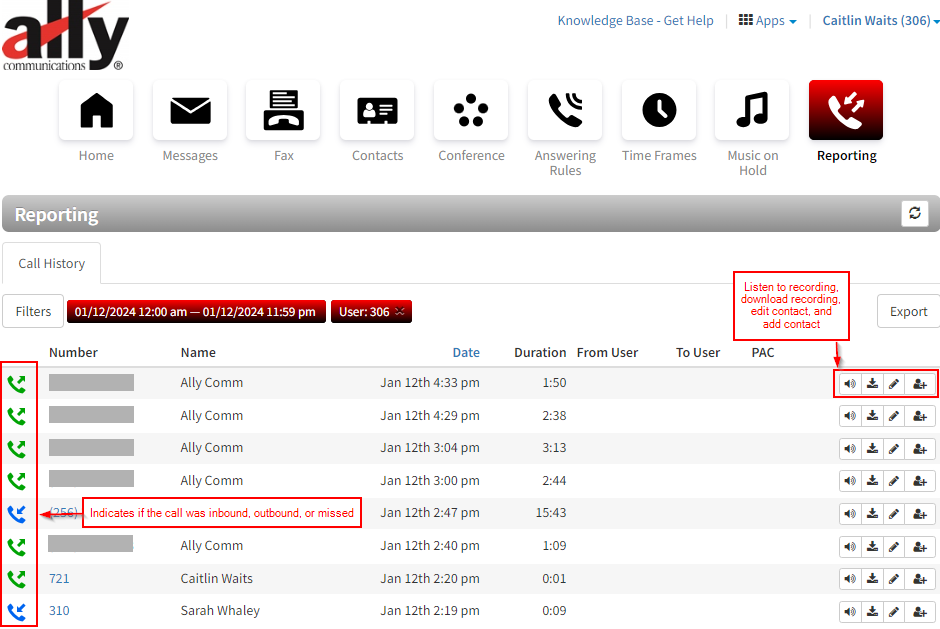
- Number: Caller ID of the caller - internal calls are represented by the extension of the internal user. (Calls retrieved from park are represented by extensions 721-729)
- Name: Inbound Caller ID name - depends on the caller if this is set. It is not in the case of the first call underlined in red, but is in the case of the second call underlined in blue.
- Date: Date and time of the call
- Duration: Length of the call
- From User: This will display if you place an internal call.
- To User: Shows what internal extension was called.
- PAC: This is negligible. This refers to the account code and is information that will only be helpful to Ally in the event troubleshooting is needed.
- Listen: Listen to recorded calls (if call recording is enabled for the user).
- Download: Download recorded calls (if call recording is enabled for the user).
- Edit Contact: Will only work if the contact had been added previously.
- Add Contact: Will give you the option to create a new contact or add to an existing contact.
Call recordings are only readily available to be listened to on the Call Reporting page for users with the advanced feature enabled.
**Call recordings can still be provided upon request within 5 days of the call being placed.**
Office Managers and Ally technicians can access additional call history data for other users if needed.
Filtering Call History
Select the Filters Button in the top left of your Call History to narrow your call history search.
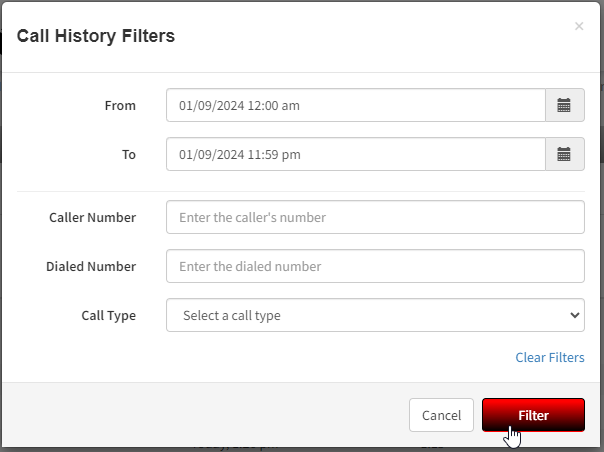
- From: The date and time of the beginning scope of your search.
- To: The end date and time of the scope of your search.
- You can look as far back as 6 months, but the maximum date range you can search at once is 90 days.
- Caller Number: You can search if a particular number called you inbound.
- Dialed Number: You can search if you dialed a particular number outbound.
- Call Type: Search for your Inbound, Outbound, or Missed Calls within the date range you have set.
Once you select "Filter", the search criteria will be applied and searched. Your filters will be displayed next to the filters button.
To remove an additional filter that is not needed, you can simply click the "x". A timeframe and your user extension are the only mandatory filter criteria.
Select the Filters Button in the top left of your Call History to narrow your call history search.
- From: The date and time of the beginning scope of your search.
- To: The end date and time of the scope of your search.
- You can look as far back as 6 months, but the maximum date range you can search at once is 90 days.
- Caller Number: You can search if a particular number called you inbound.
- Dialed Number: You can search if you dialed a particular number outbound.
- Call Type: Search for your Inbound, Outbound, or Missed Calls within the date range you have set.
Once you select "Filter", the search criteria will be applied and searched. Your filters will be displayed next to the filters button.
To remove an additional filter that is not needed, you can simply click the "x". A timeframe and your user extension are the only mandatory filter criteria.
Exporting Call History
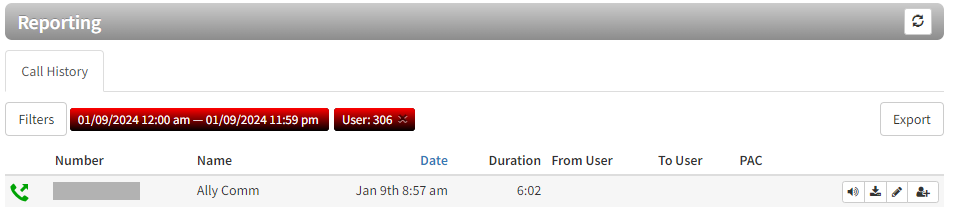
You can export the call history in CSV format, and then open the information in Microsoft Excel for further manipulation.
- From the Call History tab, click the Export button.
- When prompted, click Save.
You can export the call history in CSV format, and then open the information in Microsoft Excel for further manipulation.
- From the Call History tab, click the Export button.
- When prompted, click Save.
Scheduling an Export of the Call History
You can set to export the call history on a certain date and time and/or set it to repeat for a set schedule. The export of the call history will be in a CSV format.
- From the Call History tab, click the Scheduled Exports button.
- Click the New Export button in the next page.
- Fill in the fields regarding the schedule (See Table 11-2 below).
- Click Add when done.
Schedule New Export Settings
Setting Description Basic tab Name Provide a name for the schedule. The name can be no more than 64 characters long. No special characters other than a hyphen, space, or underscore. Enabled Select either Yes or No. Type You can choose between the following:- Monthly - On the first of every month, will execute an export of the previous month.
- Weekly - On the chosen day, will execute an export of the previous 7 days. (Includes chosen day)
- Daily - Everyday at chosen time, will execute an export of the day's records.
- Custom - Customize schedule's Capture Period, Start Time, and Repeat Cycle.
After Completion After scheduling the export, choose where the data should be exported to: "Do Nothing" (which downloads the data to the portal only), "Email Attachment", "FTP" (File Transfer Protocol) server, or "SFTP"(Safe File Transfer Protocol) server.
FTP/SFTP Info:
- Hostname is where the export will go. (e.g. sample.cdrexports.com, for non-standard port e.g. 115, sample.cdrexports.com:115)
- Username/Password is the username and password that is authenticated and has access to the server
- Remote Path (starting from root) the path the export should go to. Needs to be allocated beforehand. The cdr tool will NOT create the directory. (e.g /cdrexports/)
Email Notification This field is required if “Email Attachment” was chosen for After Completion. Will send an email to the desired email address notifying that the export is ready to be downloaded. If the user has “After Completion” as “Email Attachment”, then the email will contain the attachment. Email The email address where Email Notification is sent. Options tab User Filter calls pertaining to this user. Leave blank to see call history from all users. Include Inbound Calls The default is "Yes". Toggle to choose whether to include inbound calls in the export or not. Include Outbound Calls The default is "Yes". Toggle to choose whether to include outbound calls in the export or not. Include Headers The default is "Yes". Toggle to choose whether the generated .csv file should include column headers or not. Off-net Calls Only The default is "No". Toggle to choose whether to include only off-net calls or not. Format Format of the csv export. Is currently only set to deliver the Advanced format.
| Setting | Description |
|---|---|
| Basic tab | |
| Name | Provide a name for the schedule. The name can be no more than 64 characters long. No special characters other than a hyphen, space, or underscore. |
| Enabled | Select either Yes or No. |
| Type | You can choose between the following:
|
| After Completion | After scheduling the export, choose where the data should be exported to: "Do Nothing" (which downloads the data to the portal only), "Email Attachment", "FTP" (File Transfer Protocol) server, or "SFTP"(Safe File Transfer Protocol) server. FTP/SFTP Info:
|
| Email Notification | This field is required if “Email Attachment” was chosen for After Completion. Will send an email to the desired email address notifying that the export is ready to be downloaded. If the user has “After Completion” as “Email Attachment”, then the email will contain the attachment. |
| The email address where Email Notification is sent. | |
| Options tab | |
| User | Filter calls pertaining to this user. Leave blank to see call history from all users. |
| Include Inbound Calls | The default is "Yes". Toggle to choose whether to include inbound calls in the export or not. |
| Include Outbound Calls | The default is "Yes". Toggle to choose whether to include outbound calls in the export or not. |
| Include Headers | The default is "Yes". Toggle to choose whether the generated .csv file should include column headers or not. |
| Off-net Calls Only | The default is "No". Toggle to choose whether to include only off-net calls or not. |
| Format | Format of the csv export. Is currently only set to deliver the Advanced format. |
Related Articles
Ally Voice Office Manager Training Guide
Determine if you are an Office Manage or Site Manager. Office Managers can edit for the entire domain. Site Managers can only see/edit things assigned to the site they manage. Office Manager and Site Manager trainings will still cover all the same ...Admin - Call Reporting (aka Call History)
The Call Reporting Page ** call recording options are only available if automatic call recording has been enabled for the user, queue, or device associated with the call. This is an advanced feature that will need to be enabled by an Ally technician. ...Ally Voice - Accessing the Admin Web Portal
Admin Guide - Accessing the Admin Web Portal Accessing the Admin Web Portal Topics: All administrator tasks are performed from the admin portal. The admin portal is a web-based application that runs on any device (mobile phone, tablet, or PC) running ...Basic User Call Reporting (a.k.a. Call History)
Reporting (Call History) The Reporting page is where you can view the call history, audit logs, and content logs for the domain. Displaying the Reporting Page To display this page, click the Reporting icon on the menu bar. The refresh button at the ...Working with Call Queues
Working with Call Queues Call queues are a “waiting line” commonly used for support and sales groups. Callers receive music on hold while waiting for the next available agent. Displaying the Call Queues Page All call queue tasks are performed from ...