Record and Share a Teams Meeting

Recording a meeting or call
Start or join the meeting.
To start recording, go to the meeting controls and select More options
 > Start recording and transcription.
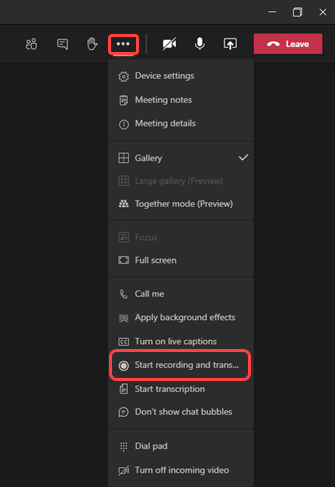
Everyone in the meeting is notified that recording and transcription has started. The meeting notification is also posted to the chat history.
 Notes:
You can't make multiple recordings of the same meeting at the same time. If one person starts recording a meeting, that recording will be stored on the cloud and available to all participants.
Meeting participants have the option of viewing the transcription during the meeting. For details, see View live transcription.
To stop recording, go to the meeting controls and select More options
> Stop recording and transcription.The recording is then processed and saved to SharePoint if it was a channel meeting, or OneDrive if it was any other type of meeting.
The meeting recording shows up in the meeting chat—or in the channel conversation, if you’re meeting in a channel. The recording doesn't expire.
 Note: For now, guests and external attendees can view the recording only if it's explicitly shared with them.
Sharing the Recording with OneDrive
To Share the file
Related Articles
Microsoft 365 - See who a file or folder is shared with & share files with specific external contacts
You can see who a OneDrive for work or school, SharePoint, or Teams file or folder has been shared with at any time. See who a file or folder is shared with Select the file. Click the Information icon in the upper right to open the Details pane. ...What version of Office am I using?
About Office: What version of Office am I using? WindowsMac Open any Office application, such as Word or Excel, and select Account. Note: If you don't see Account or you already have a file or document open, choose File from the menu, and then select ...Keeper Family Plan - Record Sharing
Keeper Family Plan - Record Sharing Source: https://docs.keeper.io/user-guides/sharing Sharing With Keeper's powerful record sharing capabilities, users can securely share their records and folders with family, friends, co-workers and others across ...Disable Automatic Pause of OneDrive sync on metered or cellular networks
THIS SHOULD ONLY BE DONE FOR METERED NETWORKS WITH UNLIMITED USAGE TO AVOID OVERAGE CHARGES 1. Open OneDrive from the system Tray icon (Blue cloud in the bottom right corner of your screen): 2. Click Help and Settings: 3. Click Settings: 4. On ...Keeper Family Plan
Keeper Family Plan Source: https://docs.keeper.io/user-guides/keeper-family-plan Keeper Family Plan This guide provides an overview of Keeper's Family Plan, including how to sign up, invite family members and accept account invitations. Overview & ...